

360° Photography
The creative approach to capturing the world around you
Like any other type of photography, 360º photography requires a combination of technical skill and creative choice. Nevertheless, the 360º photograph is always an interpretation of what things look like to the naked eye. For example – in real life, when you turn your head, your brain processes light, depth and focus in a very dynamic way. For this reason any truly successful panoramic photograph will give you the impression of what we see naturally while revealing the photographer’s impression of it.
Tools and techniques
There are many techniques available for making 360º photography and video. Even though you have the ability to make a panoramic image on a mobile phone it would be tricky to use the results to create an immersive environment. This is because there would not be enough detail.
Despite the fact that you can shop online for a seemingly high spec 360° camera for less than €500, simply comparing specifications is deceptive. What seems like high detail as often poor quality. In fact, to achieve professional looking results it’s important to understand what the real issues are in 360º photography.
What is 360º Photography?
Panoramic images wrap around the viewer. 360º Photography is generally not meant to be seen all at once but framed by a window. Much like the way our eyes take in only part of what surrounds us. It’s usually possible then to rotate your view to look in other directions and see what is normally out of eyeshot.
There are two basic types of 360° image – cylindrical and spherical. Mobile phones often generate cylindrical images where the top and the bottom of the panorama are missing. For example spherical panoramas can be stored in a variety of ways. Equirectanglar – where the sphere is stretched out into a 2×1 image and Cubemap – where it is cut into flat planes.

Cameras for 360º photography
Instant or Stitched?
There are two very different ways of capturing 360º photography. Instantaneously using a camera with more than one lens or by taking a series of photographs and then joining them together seamlessly (Stitching).
If the subject of the photograph is not moving or can be captured over a short period of time then taking a series of photographs is possible. However a camera with more than one lens is often the best solution for a moving environment due to its ability to capture a moment in one shot.
Multi-Lens 360º Cameras
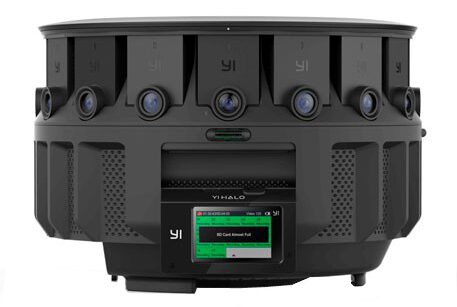
One shot purpose-built 360° cameras are widely available. They can feature anything from 2 to 100 lenses. Usually the process of joining the images that comes from these lenses is done automatically to create a seamless 360° panoramic image.
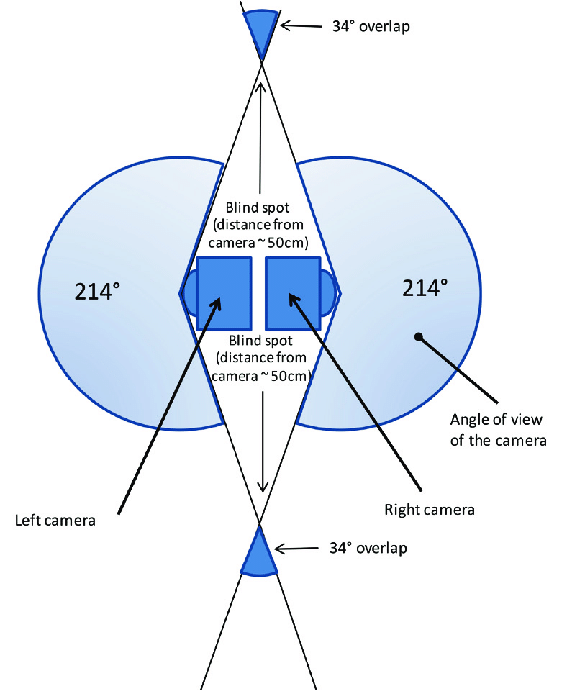
This all seems very simple and practical however there are some fundamental issues which limit the performance of this sort of cameras. For example the lens and the sensor that receives the image from the lens are usually much smaller than on a professional SLR camera. Furthermore the arrangement of the lenses and sensors makes truly accurate 360º images impossible to achieve. However this shortfall in many cases this is not apparent unless the camera is close to objects in the photograph.
When to use an SLR camera
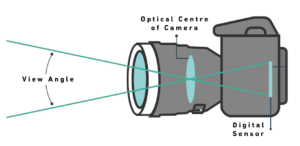
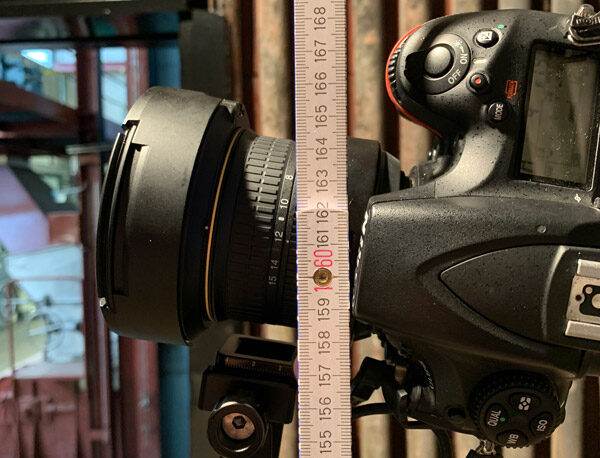
To achieve the highest quality 360° Photography two things are vital. A good lens and a good digital sensor. Undoubtedly, the quality of these items on a professional single lens reflex camera is far above anything you can find in an all-in-one 360° camera. Not out of failure, but simply because the physical space available on a one-shot camera is much less.
It doesn’t mean, however, that you can use an SLR for 360º photography all the time. In some situations this isn’t possible. For example when there isn’t enough space to put the camera in position or when the subject of the photograph is moving quickly. Generally in these situations we will use a multiple lens one-shot 360º camera. It provides a relatively high resolution but the possibilities for postproduction are limited.
360º Video
Capturing moving images in 360° Photography is usually only possible with a multi lens camera and fortunately there are a wide range of 360º video cameras that can offer very high 360º video resolution. However this high detail is usually achieved by having many lenses and sensors in the same camera. As a result hi-res 360º cameras are often very effective for outdoor photography but unfortunately quite limited when the subject of the photograph is very close because problems begin to appear in the stitching of the separate images.
A very significant issue with 360º video is finding a way to watch it in very high resolution. This is due to the fact that streaming high resolution 360 video is hugely data intensive. It requires a very powerful computer or a very wide bandwidth. Thankfully YouTube’s maximum resolution is 4K which does mean that watching higher resolution video online is not really available to mainstream users.
As a reference our Insites Immersive Training platform delivers 16k 360º images. Our approach to presenting 360º video in high detail is to add a video into otherwise still 360° photography. This technique is very popular with our clients and is mainly used for incorporating live hosts (avatars) into immersive trainings or virtual exhibitions.
Shooting 360º
Shooting on location in 360° photography is unlike standard photo shoots mainly due to the fact that adding extra lighting is tricky. This is because the lights themselves would be visible in the shot. It’s important to maintain a continuous look not only within one panoramic image but from one POV to the next.
For example windows and darker interior areas etc. can be quite problematic visually and things need to be evened out. With this in mind it’s often wise to photograph in high dynamic range HDR. This is in effect taking a series of different exposures from each angle so that you can deal with big differences of light and dark in post-production.
Capturing the environment
360º Photography with a single lens camera
Using a full format digital camera to capture high quality 360º photography requires a number of steps. Firstly, we shoot a series of high resolution images from exactly the same position but a different rotation. Normally this means four directions at 90° to each other. Each one of those angles will often be bracketed for different light levels, so in effect one panoramic image can be made from 20 still images or more.
One-shot wonders
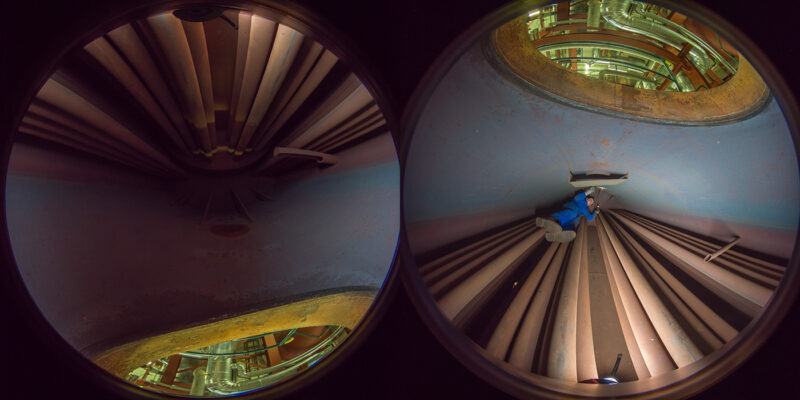
Sometimes it’s very tricky to fit the camera into the space. For example, inside a closed compartment it’s very difficult to set up a tripod and a full sized camera. In these situations, the one shot camera is a good replacement for the SLR. Even though there is some reduction in quality, the shots that you can achieve can be very interesting.
Furthermore it is sometimes a real challenge to get artificial lighting into dark environments. This is due to the fact that when you shoot 360º Photographs, you can see everything. To overcome this challenge we use a series of special lights, which either fit naturally into the environment or even hide directly beneath the camera!
Post production
It’s important to realise that what makes a photograph look really professional is post processing. In other words how the originally captured image is digitally enhanced to improve its appearance, or give it a particular stylistic tone. This is both a creative and a technical challenge which has immense importance but is often underestimated. It requires intention, experience and specialised digital tool sets.
What’s even more challenging is in the case of 360º photography there is the added task of seemlessly stitching together images and ensuring that nothing looks either too dark or too bright while the viewer looks around.
Stitching images together
It’s often overlooked that 360° photography is always made from more than one image which has been joined together , the process of joining multiple images together and blending the overlapping areas is called stitching.
There is a simple basic theory behind stitching images together in 360° photography. It lays in the ideal concept that if the lens is perfect and the focal point is exactly in the same position and you overlay the two images they will lineup regardless of which direction you point the camera.
Unfortunately lenses are never perfect and it’s very difficult to turn the camera and keep the focal point in exactly the same position. In reality we need to use various tools to deal with any errors that come from the real world of imperfect lenses and cameras.
Significantly, the tools for blending and stitching images have become more intelligent over the past 10 years, what’s really important is the source material. These images below show for 90° views which are stitched together to make the image underneath.

Equirectangular Images
360º Photography may seem three-dimensional but in fact it is made up of flat images. These are in effect a sphere that has been rolled out- a familiar example would be a map of the world.
We call these images Equirectangular. Unfortunately they do not represent perfect system because the area at the top and the bottom of the image is represented by many more pixels than the middle parte. In the process of treating these images it’s important to realise that the left and right hand side of the image connect with each other like a loop so any kind of touching up of the image will show up if it’s right at the edge.
Colour grading
The colour of the light in a photograph affects the way the colour of the objects in the space appears. For example electric lights have a yellow colour to them while daylight is slightly blue. It’s important to understand that our brains are excellent at reading the colour of light. In effect our brains filter the world so we can tell the real colour of objects that we see.
Although it takes a lot of high-powered kit to grade RAW 360º images in HDR at this very high resolution, the challenge is to make colours look real. Furthermore to add creative styling to them is what makes professional photographers into creative interpreters of the subjects they record. Below is an example of how the untreated image differs from what what was finally used in the Insite.


